
We have a Braun Thermoscan infra-red (IR) thermometer that has been working perfectly for about five years. It started complaining about low batteries and shutting off, despite me replacing with new batteries that I checked had plenty of charge.
When I opened it, I discovered that the batteries connect to the circuit board via simple metal clip contacts, and that the contacts had some corrosion on them, which was preventing power from getting to the board, hence why it was complaining of low batteries.
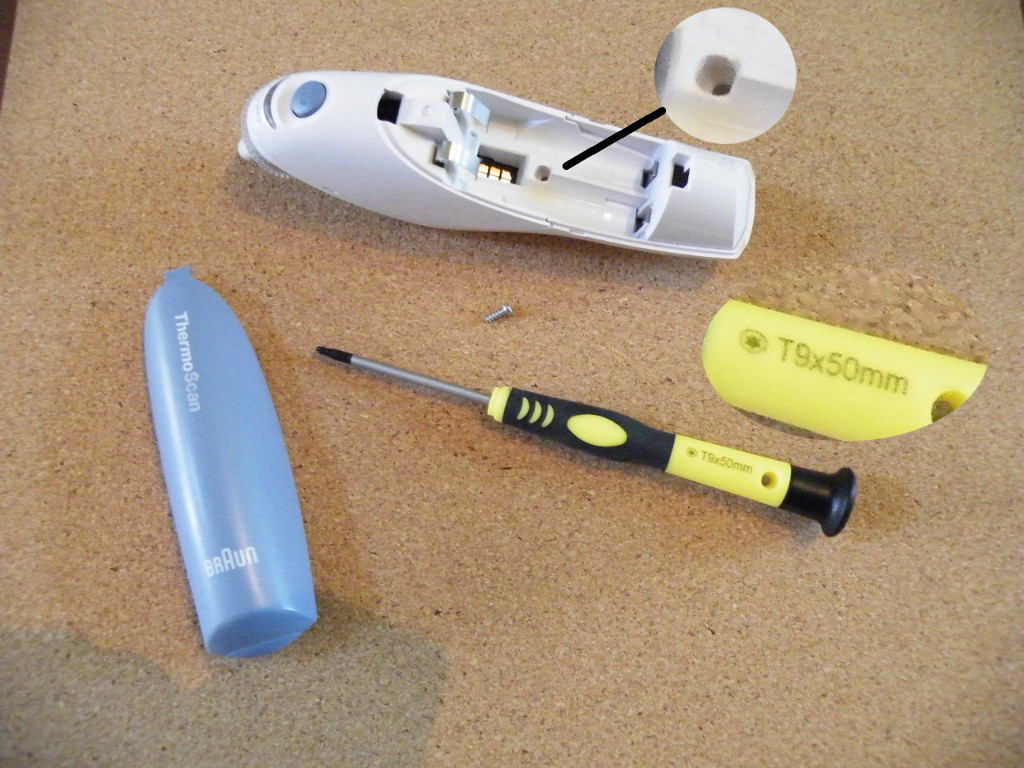
So a very simple fix is to just clean the corrosion from the battery terminals inside the thermometer. You’ll need a Torx T9 screwdriver (Maplin, eBay, Amazon, maybe pound shops).
Start by removing the battery cover and the batteries. The image below shows the location of the screw in the battery compartment, that when removed will allow you to open the thermometer casing, which separates into the two halves.
The next image (below) shows the location of four tabs (marked as ‘x’) that clip the two halves of the case together – they can be squeezed and prised apart gently to un-clip, and the case should come apart quite easily.
Note that for two of the clips, the top half of the case clips into the bottom half, and for the other two the bottom half clips into the top – it might help you figure out which bit to squeeze and which bit to prise, but in any case I managed fine without that information.
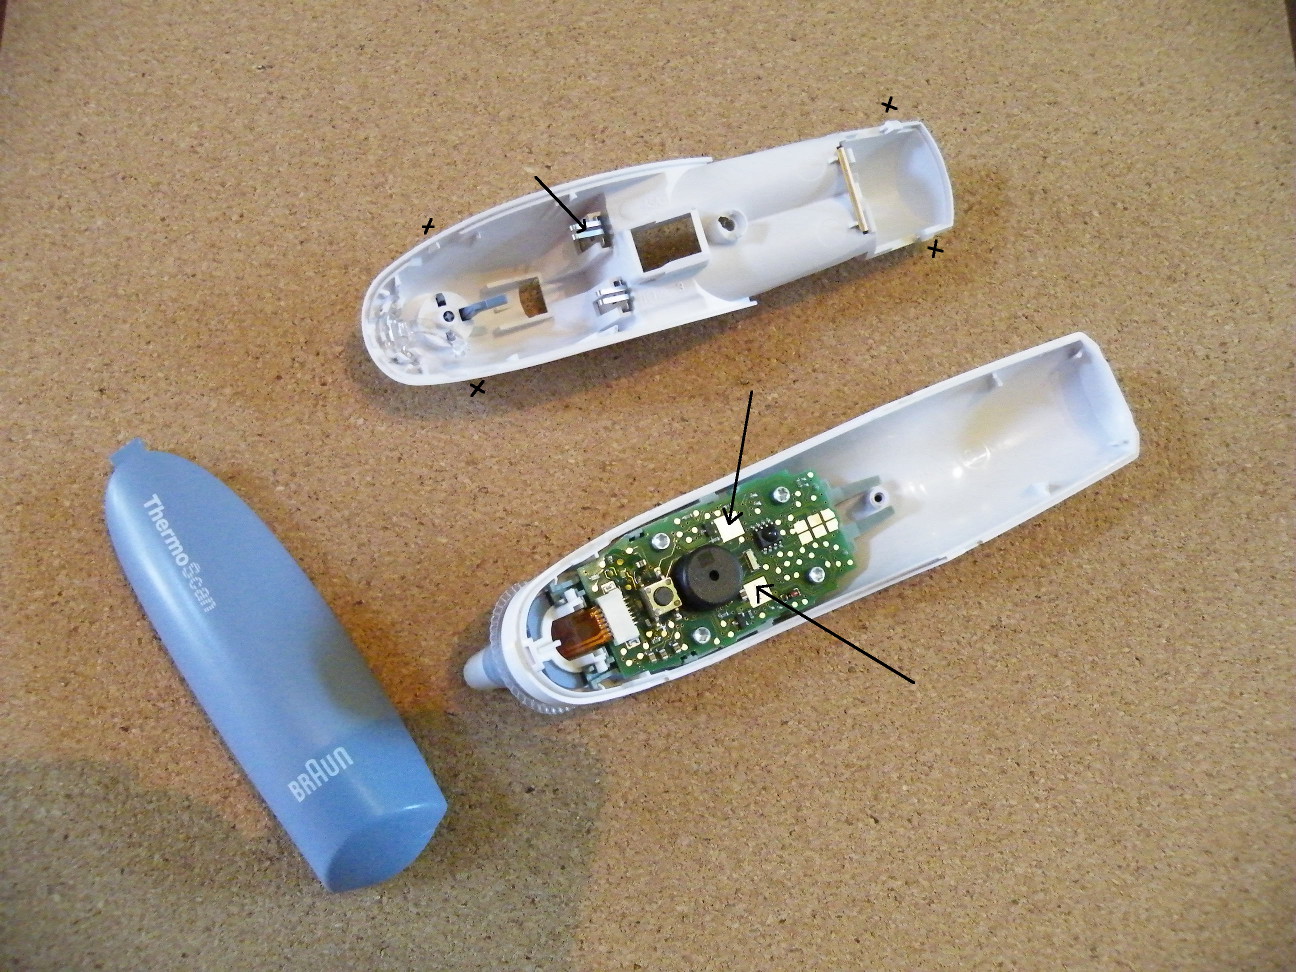
This image above also shows the contact points on the circuit board for the battery connection. This is where some corrosion had formed, and I could remove it simply by scraping lightly with a small screwdriver (the corner of a scourer would also have worked).
With the corrosion gone, the thermometer was working perfectly again. I just had to clip the case back together, replace the screw, then the batteries, and that was it all done.
This design probably applies to other variants of Braun Thermoscan thermometers – they all look roughly the same, just differing in features such as pre-heating, illuminated displays, reading memory, etc.
Braun: this is a design flaw. A bit of wire soldered on would have prevented this product from failing prematurely. One corner too many cut in production, I think.
Thanks for the info… my braun thermometer also having similiar problem but is not the contacts corrosive but the spring contacts got “loose” and having problem contact with the PCB board’s contacts. I bent it and it works like charm..
Thanks for the fix description and the great pics! Using your guide I fixed our Thermoscan, which had been working flawlessly for eight years up until last week.
Really pleased to hear that it helped. Hang on to that model of Thermoscan because the newer (and cheaper) ones don’t seem to be quite as good – the temperature can vary significantly between readings unless positioned perfectly, and there’s an illuminated display that makes it difficult to use in the low-light, because it shines in your eyes while you try to get the positioning right.
More features make it less functional.
Thank you so much! My thermoscan wasn’t turning o. At all and I just did this and it worked!!!! Saved me over $50 because I was already shopping for a new one.
Anybody know how to open the battery compartment of Braun type 6013 thermometer? I think my thermometer have the corrosion problem too.
Same problem here with the bent contacts for the battery not making contact. Love this thermometer but being an electronics engineer and looking at the circuit board and overall design of how it powers up I agree with the comment that the design is poor for expecting a long term product life.
Thanks for those instructions. We’ve had the exact model and I just went to lend it to my dad when I realised it wasn’t working. Followed these instructions and now it works absolutely fine.
A big “Thank you!”! Kevin. We have little kids at home and cannot live without a reliable ear thermometer and they are not cheap. Ours just stop working all together one day. We bought a new one, but was never as reliable. I tried your method to fix our old one – it worked like a charm. Thanks for the great photos, made it easy and possible for me!
Glad it was helpful – the original model really is so much better. We have found that the newer model is a bit more reliable when the tip is pointing snugly into the ear canal, but the glare from the screen still makes it difficult to take temperatures at night, when kids are drowsy or sleeping.
Kevin! You are awesome! Thanks for the tips! Saved me a 100 dollars.
Big thanks to you! It really helps! Those photos makes it easy for me to follow the instructions. Its working fine now! Thanks a lot! ?
My Braun thermometer’s temperature will not rise above 97.6 F or C. How can I fix it? I think the warranty is expiried by now.
For medical devices, I wouldn’t recommend trying to replace components, unless I could be absolutely certain of why a component has failed. Better to simply replace it
Thank you very much!!! Our Braun is nearly 10 years old already and stopped working with no warning. I followed your helpful instructions. Although I didn’t see any corrosion on the contacts, I scraped them with a flat screwdriver in any case and it works fine now.
I used the thermometer for a while with low battery and it went flat dead.After replacing the batteries its not turning at all. Tried all the tricks on this forum. Any other thoughts ??
I’d look for signs of leaking batteries, both at the battery terminals and on the board. Perhaps wipe the circuit board and connectors with a damp cotton bud to see if significant amounts of residue show up (there should be little to none). If the cotton bud picks up a lot of stuff anywhere, then clean everything gently but fully. Only use abrasives on the battery terminals. Try to leave the actual sensor entirely untouched. Pay attention to the buttons on the circuit board – if rusty fluid got into them, it could have created a short circuit that is making the controller chip think the button is continuously pressed (e.g. it could be stuck waiting for the button to be ‘released’). Wait until it’s fully dry before testing.
Thanks for the information. My braun thermometer kept showing error. Thank god I found your forum I was actually thinking of buying a new one, I followed your instructions it was actually the spring contacts that got “loose” and was having problem to contact with the PCB board. I bent it a little and it works perfectly fine now.
My braun thermometer keeps giving me a POS error OR it gives me a false reading of HI or 41°c. I have verified that it not the temperature with another thermometer.
Seems plain faulty to me. While there may be components that could be replaced with good soldering skills and suitable replacement parts, my opinion is that it’s not worth the risk of false readings where someone might be running a high temperature. I would just replace it.
Thanks so much. Followed your directions, worked like a charm. You saved me $80. ?
Praise be to God, I found your post, tried your solution, and thank God it worked! Thank you so much for the detailed instructions and photos, wouldn’t have fixed mine without them. Thanks!
Thank you so much. I followed your instructions and it worked.
Thanks for posting this.
I manage to save my 5 yrs old thermo.
A less electronic waste polluting our world.
I found out that my braun thermometer had a battery leak and corroded one of the metal contact on the circuit. Is there any suggestions to make it work again??
Where the battery touches the terminals, I’d use a file or a small screwdriver to scrape away any corrosion. For contact pads on a circuit board, you have to be a lot more careful. I usually scrape very lightly with a screwdriver, or perhaps use the corner of a kitchen sponge (the scouring side). Remember to also check the metal that touches the pad, since this will probably be corroded too.
Thanks, it saved my 4 years old thermoscan and i don’t need to buy a new one!!!
Thanks so much. Repaired a thermometer over 10 years old! I used edge of a screwdriver then a pencil eraser. If I had more patience I would’ve used baking soda and water solution with a q tip and/or steel wool or fine sand paper.
Thank you. Followed your description and fixed my thermo. Had same problem; failing battery was replaced but then no power and didn’t work. Follow this advice if you have a similar problem.
Thank you so much – I didnt get battery corrosion but my 12 year old thermoscan “died” last year when changing batteries. Turns out it was the spring as well – i just bent it out a bit more, the battery fits more tightly and it works!!
chris.
Thanks, I was just about to trash my braun so I figured what do I have to lose. I followed the directions and opened it up. I didn’t see any obvious corrosion but I went over the leads with a screwdriver anyway and once I put it back together it turned on right away. I tested it on several healthy people and it reads great. Thanks for helping me fix it.
WOW, TY. I did a little extra scraping. i scraped the metals contacts where the batteries touch. TY, again.
Thank you so much. I’m battling to get a screw driver to open it up but will try tom at hardware . These are so expensive abs it’s exactly 5 years that we have ours. With two small kids we need a reliable thermometer!! So will try your advice. I’m so glad I found your article thank you !
Our thermoscan had been working well, but I am not 100% sure if it is me or just in daylight (I tried using in a dark room). But the light stays on until the moment it gets a reading and then the backlight turns off immediately. Bit of a pain as that is when you want the backlight on! Anyone had similair problem? Also I put cheap coles batteries into it, but they are brand new, so still should be fine?
Assuming this is a more recent Thermoscan with a multi-coloured backlight, it might be that one of the LEDs is faulty – e.g. when you get an OK reading, the backlight turns green. If green is faulty then it will be as if the backlight turned off. Try faking a high temperature to see if it switches to red immediately on getting the reading.
Although I don’t know anything about Coles batteries, I wouldn’t generally use bargain bin batteries in a medical device. They so rarely need changed that it’s better to pay for a quality brand. Keep the cheapos for everything else!
Our Thermos can took a tumble yesterday…not from a great hight or force but the batteries fell out and the display panel slightly unclipped. However when put back together I get an alarm (doesn’t repeat) then constant flashing light and flashing display. I’ve held down and pushed all buttons, turned off and on but nothing works, I changed the batteries too and even the ear cover thing. Any ideas on how to fix this? Many thanks in advance.
I don’t know what’s wrong, from your description, but it does seem to be at least behaving rationally. Often this kind of feedback indicates a broken connection somewhere. Perhaps the temperature sensor in the head of the unit has become detached? Are you sure you fully re-clipped the loose panel? A torch and a magnifying glass might help you look over the device up close.
Thank you for the post. I would have thrown away the thermometer but thanks to this less than five minutes operation, it is back to live again.
Thank you Kevin. I just fixed two old models with your tips. Scraped the metal contacts and good as new 🙂 My boy had a high fever and needed it to work.
Hi Kevin, im having the same battery problem as yours in the same model. Trying to follow your fix, trying my best to open it, but once the screw is out, i dont know how to open it further. Im stuck. Can u pls help. Would love for u to put up a utube video so its easily follow able.
I bought an omron thermometer meanwhile, and its horrible. Unless in the ear canal properly, it gives odd readings.
I want my braun one to work again.
Pls help.
The clips on the case are marked in the picture – you should be able to click on the images to get a larger version (this was broken on the site when you looked, now fixed). You may have to look closely to see, but if you squeeze the top half of the case near the bottom end of the unit, you should be able to prise them apart quite easily. Similarly at the other end, squeeze the lower half of the case and prise. Neither pair of tabs need much force to separate – much easier to do than to describe!
Thank you! Got my eight-year-old thermometer working again. In addition to scraping the contacts with a screwdriver, I used a small nail file built into a set of fingernail clippers.
It works..! Thank you 🙂
Thanks for the useful tip! Managed to fix mine as well!
Thank you! My thermoscan had been working fine for the last five years but then appeared dead this morning – it just wouldn’t switch on even with fresh batteries. I cleaned the contacts with a small piece of emery cloth as your instructions and now it works again. It is awesome when people like you freely share your knowledge to help others – chapeau!
Thanks! You just saved me US$50
Wow, thanks Kevin, I followed your very helpful instructions and it solved the problem I was having with our 10-year-old Braun thermometer. Your instructions are quite clear and, in my opinion, better than following a YouTube video.
Thanks! I had almost given up when I found this page. I thought it was the end of the line and I’ve had this thermometer since around 2004 and it just started to fail. It would turn on and then a second later turn off. I took it apart and after trying some other online suggestions to no avail, found your page and, sure enough, the left connection was corroded. I wasn’t brave enough to use a screwdriver to scrape the circuit board, but a couple of Q-tips did the trick. Hopefully now I will get a few more years out of it. I haven’t heard great things about the new versions and I haven’t been really successful with the forehead thermometer.
Really great instructions, thanks a lot! It helped me to fix my bent spring contacts. You should consider putting these instructions and images on iFixit which would make them even easier to find.
I took a look at iFixit, and it does seem an OK site, but they assert the right to re-license contributors work which means that it could in future be sold on for advertising click-bait, sign-up dependent content, etc. I don’t know much about CC licensing, but anything I donate my free time to has to remain unconditionally free.
However, since you have already dismantled your device once, you could easily write up something similar to post elsewhere.
Thank you! You have been great help. Was kind of sad when I just could not get the Thermoscan 6022 to start up after changing batteries. Then I stumbled upon your article, followed your instructions and now it is working again.
Thanks Kevin, problem exactly where you said Corrosion in between battery contacts and circuit board. I did add a drop off of DEOXIT to each contact .
Thanks for the feedback. For anyone like me who’s unfamiliar with DeoxIt, it’s an electrical contact cleaner. However it’s pricey (very!), and I don’t think it’s worth buying specifically for this job, particularly since we’re just cleaning battery terminals (though it makes sense to use a contact cleaner if you do have one already).
Thank you so much for explaining how to do this. It worked liked a charm. I have had my thermoscan since 2000 – impressive!
Thanks for keeping a perfectly good product in service, and out of landfill.
Googled searched lots of website before finding this page. Managed to fix my Braun irt 4520. Thousands of thanks!!!
Hey, I just learned the model number is 4520. Thanks!
Thank you very much for the help Kevin! My Braun Thermoscan is now functioning again! Yay!!
Thanks Kevin as I followed your advice and my 6020 seems to be working again. It was saying lo then hi. I changed the batteries and then just got a constant error message or a reading of 41c! I was just about to throw it out when I found your advice. Followed it and it is working and giving realistic reads again. Thanks so much.
Glad it helped! Thanks for sharing the symptom details.
Thanks so much for this. Found this site and the fix works perfectly!
Thank you so much. We fixed ours. the kid was helping. She was so happy when it was fixed.
Great to hear you involved your child, and that she enjoyed it! I’m cautiously optimistic that the youngest generations are more savvy to resource squandering that our generation of pathological consumptors!
Hi there!
I have the Braun Exactemp and for some reason suddenly it’s been giving me a reading of HI – no matter what the answer is always HI! I checked it on myself and it does the same, so I’m sure the reading is not accurate. It was running on low batteries for a while so I’m not sure if that has anything to do with it. I replaced the batteries and made sure to use a new tip but same problem. Kindly advise and thank you 🙂
I’m sorry, I’ve never seen inside one of those. Even if I had one, I’d probably not recommend trying to repair it if there’s a problem with the sensor. Though it could likely be repaired, it’s for measuring body temperature for fever, so I think it’s safer to just replace it.
That being said, before binning it, you could take the batteries out and leave overnight – when batteries get very low, microcontrollers can misbehave and end up in an unpredictable state. They usually have protection against this (brown-out protection), but you never know. Also, holding the power button for 10 or 20 seconds is a common way for designers to add a hard reset to electronic devices.
Thank you! It worked.
Hi I read ur thread but my problem still not getting solved how to adjust the clips ?
I tried to remove corrosion on one golden chip it’s not getting off
If soldering is not possible, then perhaps you could very carefully bend the clips (only a small amount) so that they rest on a slightly different part of the copper pad. Alternatively, kitchen foil could be used to increase the surface area of the clip.
You won’t get all the corrosion off – being too harsh could damage the pad. However, scraping enough so that the pad is at least flat again will allow the clip to make better contact. Also check the clip itself – it may need cleaned too.
thank you so much. I just used your article to fix my thermometer. it was exactly what you said – corrosion. I scraped off as much as I could and it works perfectly now. question – how much more time were u able to squeeze out of the your thermometer after scraping off the corrosion? did it last a few more years? months? just curious how much more time I have now that its working fine. thank you!
Mine has never failed since, it’s still running. So, yes – years. And years. Time flies! It could depend on humidity levels in your area of the world I suppose, but hey – you know how to fix it now.
Thank you so much for sharing this. I bought my thermometer in the US (I live in Korea) about 5 years ago and it stopped turning on recently. I thought I was going to have to shell out $100 for a new one here but I found your fix and it worked like a charm. Definitely good to have during this flu/corona virus season!
Thank you very much for sharing this guide and photos. My 8-year old thermoscan started working again.
After initial cleaning, it turned on (it wouldn’t turn on before) but was flashing low battery. Had to take it apart and clean every contact again and then it worked.
Thanks again!
Thanks a lot. It worked completely as you have described. Perfect!
Hi I can’t get my thermometer to work the ear piece isn’t picking up so it won’t Register that there’s one on there what can I do??
On my thermometer, there’s a little red pin that gets pressed in when the earpiece cover clicks into place. This is a button that tells the thermometer that a cover is present.
If the cover isn’t clicking into place, you’d need to look and see why. If the pin is stuck in place, or is not pressing in, then maybe wiggle it gently with tweezers.
We rarely change the cover, since it’s only used in our household – an alcohol wipe can be used to clean it. If anyone had a suspected ear infection, obviously I’d take more care. Therefore, I’d personally be ok using it without a cover, and just tape the pin down if needed.
That worked. Thanks a lot!
Thanks. Totally worked!
Thanks for this. Mine was 13years old and had stopped working with exact same issue. This fix has saved me from having to buy one with inflated prices during this Covid-19 outbreak.
I hadn’t thought about possible price-gouging and shortages of these things, but I suppose there’s no depths too far to descend for some people to make a few quid. I read recently that vaccines (e.g. seasonal flu) are sold to the highest bidders first, rather than by triage, so it’s not just unscrupulous Amazon sellers that are at it.
It worked! Thanks a lot!
Thank you. Worked on two thermoscan. We bought one 3 years ago to replace the other that was not working.
The pads on the circuit board are worn through. Do you think some solder over worn patches would work? Any other products available? Not too skilled with solder gun.
Yes, solder should work, but perhaps a small piece of kitchen foil might be enough to bridge the damage?
My approach would be to lightly tin what remains of the tab, and tin some multi-core wire. Then solder the tinned threads to the pad and snip them to leave fresh points of contact. You have to take a lot of care with damaged pads, not to rip them up.
There is a little red pin that is sticking out and preventing plastic ear protector from sitting straight therefore it errors. Any clue how to fix please?
The little red pin is essentially a push-button that should push in easily when the ear protector is attached. If yours is not pressing in, then it must be obstructed somehow. I would first try wiggling it carefully, to see if it could be freed up (tweezers might help).
Otherwise, you’d need to remove the PCB. Looking at the picture, it has four screws with torx (star) heads. I have a vague recollection that the board lifts up ok without having to disconnect the ribbon connector.
Thank you so much – I will take it apart and have a go. Really appreciate you replying.
Amazing, another one saved from landfill at a time when another cant be sourced. Thank You!
Thank you, still useful. We’re all using our several year old Thermoscan a few times a day now, just to check for fever. I had worried about trying to locate another one right now, but this fixed it.
It is helpful to know how the top and bottom clip together, though it’s easy to miss the small X in the photo that indicates where the clips are.
Thank you. Great info. I have been searching for solution. Mine got some corrosion on the left plate. It works now 🙂
I have the Braun Exactemp model 6020 and for some reason suddenly it’s keep flashing the green light & screen. I try to take out the battery and put back again, it still doesn’t work.
That’s a system error, so it’s probably faulty. It might be worth removing the batteries for an hour or two, to reset the device. Or, maybe holding the power button for 10 or 15 seconds performs a system reset? No harm trying, but don’t hold out too much hope!
Thanks for your reply, Kevin. I try to remove the battery and also holding the power button for 10 to 15 seconds. It still doesn’t work.
AMAZING! Thank you so, so much! It was really corroded and I was doubtful if it could be repaired, but the green light blinked back to live. You are a great person.
My Thermoscan was coming up with the POS error all the time and when opened up realised the battery connectors were corroded. Scraped all the corrosion off and tried again but still kept giving the error.
I then held down the on/off button for a while and it beeped and flashed off’
When i then pressed the button some options came up and one was CAL.
Selected that and now the device is working fine again
Hope this helps
That’s interesting, thanks for sharing. CAL might refer to calibration. If so, you might want to verify that the temperature ranges are accurate. Something like pointing it towards a metal flask of water of known temperature. Or just compare with a known-good thermometer, if you have one to hand.
Thank you for this great advice. Followed the steps and my Thermoscan 6022 is working perfectly again.
Just to add to the many thanks already, my thermoscan had corrosion on one of the terminals. I cleaned it of and it now works perfectly. My wife thinks I’m a genius. Thanks
Thanks so much!!! It was indeed corroed contacts. I cleaned mine and it’s working 🙂 In time of coronavirus this information is priceless.
Hi.. I am searching through online and found about your post. Actually i am looking a way to fix my thermometer as well although i had did what you had suggested. But i guess there is some pattern broken on my PCB. So, i would like to request whether you can capture your thermometer’s PCB which clearly shown the pattern? I would like to make it as reference. Hope you can help. Thanks.
Hi JC, I’d normally be happy to do this, but I’m reticent to dismantle my thermometer right now.
You could take a photo of your board with a bright light behind it. You’ll see the traces, and zooming in might show cracks in the copper. Similarly, using an eyepiece magnifier with a torch behind the board can show a lot. I’d also be looking for datasheets on any components I could identify to work out what traces are for what purpose, and check the voltages as far as I could on the PCB. Always from pin to pin rather than from joint to joint, since it’s the joints themselves that would be the most likely to fail (and more so than copper traces, in my experience).
I have this thermoscan and one of those gold square is broken. Can i still fix it? If i could, what should i do ? Thanks
You’d need a soldering iron. The usual fix is to gently scrape away the coating on the circuit board trace that connected to the gold square to reveal the copper. Then apply some solder to the trace, and also to what remains of the gold square. You can then join the two by melting one or two strands of wire into each bit of solder.
It can be fiddly – a magnifier helps a lot. You’ll need tweezers to hold the wire while soldering. You won’t need to use much solder, just make sure the wire is cleanly joined, and no more.
If there’s no gold square left at all, the you’d have to make an equivalent, perhaps by coiling one end of the wire strand(s) and tinning with solder, before joining the other end to the copper trace you scraped back.
If this doesn’t make sense, email me a photo of the broken pad and I’ll comment more specifically.
Thank you, thank you, thank you…..
You just save me Over $150 AUS